
At One2N we created Cloudlens. It is a Terminal User Interface (TUI) for accessing important resources of AWS. We recently made cloudlens self-updatable. i.e., with cloudlens update, you can easily update cloudlens to the latest version. This blog post covers how you can make your own Go binaries self-updatable.
Why make binaries self-updatable, really?If you have worked on building Go CLIs, managing their version becomes problematic. How do you ensure your users are always running the latest binary? How do they even find out that there’s a new updated version of the binary?You can solve this by making your binaries self-updatable. No need to depend on brew , apt-get, yum, or any other package managers. You can just run ./<your-app> update to update the app to the latest version.This helps users update to the latest version of software easily. As part of the update process, you can even show release notes and other important info to your users.Apart from user experience, this also becomes easy when you have a popular app with wide distributions such as different OSes (Ubuntu, RHEL, Mac, Windows) or CPU architectures (Intel, AMD, AWS Graviton). Creating OS-managed updates for your app (apt-get, deb package, .exe installer) can become too much work. We can use the self-update mechanism to handle the “Update” part of the process regardless of OS or CPU architecture.
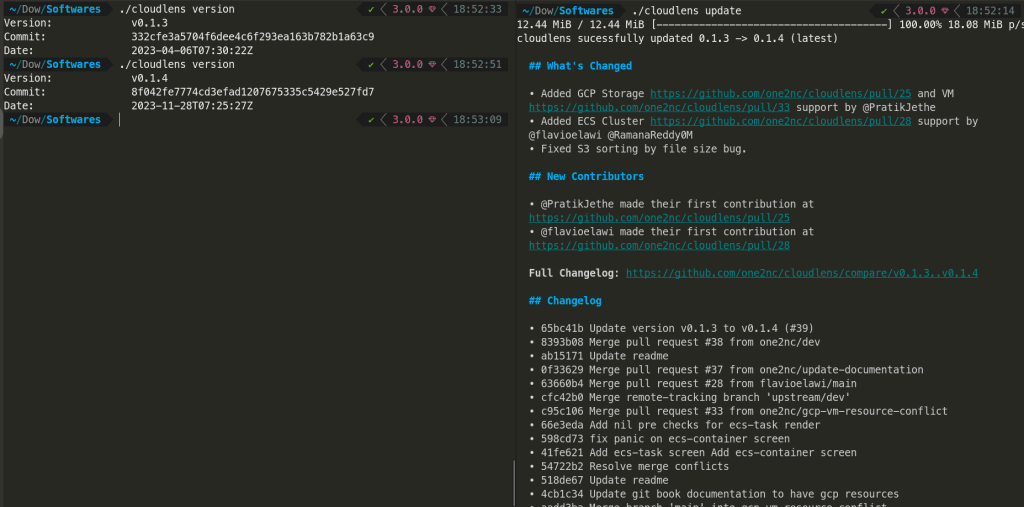
What does the user experience for self-updatable binary look like?
As part of the normal CLI usage, you can find out whether the user is running the latest version. If not, then display some warning message to remind user to update.
This way, user knows they are running older version and can update the CLI with update option.
User can then run the ./<your-app> update to see something like this.
How to make binaries self-updatable?
We can break this down into two parts:
Normal execution flow
Find out the current version of your local binary
Get the latest binary version info from the server
Compare versions and inform the user if they are running an outdated version
Update execution flow
Download the latest binary for your OS & architecture
Replace the local binary with newer binary
Show release notes
As a developer, we use a lot of Command Line Interface (CLI) apps in our daily life. Some quick examples can be GitHub CLI, K9s, or even VIM. CLI apps provide a fast experience and increase productivity by eliminating the number of clicks. However, updating these apps can be challenging as these apps are most often self-contained binaries downloaded on users’ machines, and we have little control over that. Having developed many such CLI apps in Go before, we understand this problem, and in this blog post, we share an approach to solve it.
If you’ve built and distributed the app as a downloadable binary, asking the user to repeat the same process for a newer version is tedious and harms the user experience. We suggest you make your application “self-updatable”. This way, the application can check if any new releases are available and hint to the user that it can update the app whenever it wishes. Then the user can pass an additional CLI flag such as -u where the app will update itself correctly and let the user know. This provides a very smooth experience to the user as well.
Step 1: Get the latest release information
// Code snippet: Fetch the latest release information from GitHub
latest, _, err := githubClient.Repositories.GetLatestRelease(context.Background(), "<org>", "<repo>")
Step 2: Form an executable name
We will create an executable name based on the machine’s OS, ARCH and the latest tag name.
// Code snippet: Form an executable name based on assets in releases page
executableName := "cloudlens_" + strings.TrimPrefix(latest.GetTagName(), "v") + "_" + runtime.GOOS + "_" + runtime.GOARCH
Note: Formation of this executable name is completely depends on Github released assets.
Step 3: Lookup executable in the latest release information
Next, we need to find the executable in the latest release assets that matches the executable name we formed in Step 2. We will also get the corresponding asset ID and format (zip or tar).
// Code snippet: Lookup executable in the latest release information
var assetId AssetId
var format AssetFormat
loop:
for _, v := range latest.Assets {
    asset := *v.Name
    switch {
    case strings.Contains(asset, ".zip"):
        if strings.EqualFold(asset, executableName+".zip") {
            assetId = AssetId(*v.ID)
            format = Zip
            break loop
        }
    case strings.Contains(asset, ".tar.gz"):
        if strings.EqualFold(asset, executableName+".tar.gz") {
            assetId = AssetId(*v.ID)
            format = Tar
            break loop
        }
    }
}
Step 4: Download the latest version
Using the asset ID in Step 3, we will download the latest version of the executable from GitHub.
// Code snippet: Download the latest version
func downloadAssetFromID(assetId AssetId) (*bytes.Buffer, error) {
	_, rdurl, err := githubClient.Repositories.DownloadReleaseAsset(context.Background(), "one2nc", "cloudlens", int64(assetId), nil)

	resp, err := httpClient.Get(rdurl)

	defer resp.Body.Close()
	bin, err := io.ReadAll(resp.Body)

	return bytes.NewBuffer(bin), nil
}
Note: The artifact downloaded from Github is a zip file.
Step 5: Extract the executable based on the format.
Using the AssetFormat(Zip or Tar) in Step 3, we will extract the executable using archive/zip and archive/tar libraries.
// Code snippet: To extract executable
func getExecutableFromAsset(assetId AssetId, format AssetFormat) ([]byte, error) {
	buff, err := downloadAssetFromID(assetId)

	if format == Zip {
		zipReader, err := zip.NewReader(bytes.NewReader(buff.Bytes()), int64(buff.Len()))

		// Zip reader logic
	} else if format == Tar {
		gzipReader, err := gzip.NewReader(buff)

		tarReader := tar.NewReader(gzipReader)
	}
	return nil, fmt.Errorf("executable not found in archive")
}
Step 6: Apply the self-update
Now that we have the latest binary, we’ll use the github.com/minio/selfupdate library to apply the self-update.
// Code snippet: Apply the self-update
bin, err := getExecutableFromAsset(assetId, format)
if err != nil {
	// Handle error - can't get executable
}
updateOpts := selfupdate.Options{}
if err = selfupdate.Apply(bytes.NewBuffer(bin), updateOpts); err != nil {
    // Handle error - update failed, roll back if necessary
}
Reference to complete working example: https://github.com/one2nc/cloudlens/blob/main/cmd/update.go
At One2N we created Cloudlens. It is a Terminal User Interface (TUI) for accessing important resources of AWS. We recently made cloudlens self-updatable. i.e., with cloudlens update, you can easily update cloudlens to the latest version. This blog post covers how you can make your own Go binaries self-updatable.
Why make binaries self-updatable, really?If you have worked on building Go CLIs, managing their version becomes problematic. How do you ensure your users are always running the latest binary? How do they even find out that there’s a new updated version of the binary?You can solve this by making your binaries self-updatable. No need to depend on brew , apt-get, yum, or any other package managers. You can just run ./<your-app> update to update the app to the latest version.This helps users update to the latest version of software easily. As part of the update process, you can even show release notes and other important info to your users.Apart from user experience, this also becomes easy when you have a popular app with wide distributions such as different OSes (Ubuntu, RHEL, Mac, Windows) or CPU architectures (Intel, AMD, AWS Graviton). Creating OS-managed updates for your app (apt-get, deb package, .exe installer) can become too much work. We can use the self-update mechanism to handle the “Update” part of the process regardless of OS or CPU architecture.
What does the user experience for self-updatable binary look like?
As part of the normal CLI usage, you can find out whether the user is running the latest version. If not, then display some warning message to remind user to update.
This way, user knows they are running older version and can update the CLI with update option.
User can then run the ./<your-app> update to see something like this.
How to make binaries self-updatable?
We can break this down into two parts:
Normal execution flow
Find out the current version of your local binary
Get the latest binary version info from the server
Compare versions and inform the user if they are running an outdated version
Update execution flow
Download the latest binary for your OS & architecture
Replace the local binary with newer binary
Show release notes
As a developer, we use a lot of Command Line Interface (CLI) apps in our daily life. Some quick examples can be GitHub CLI, K9s, or even VIM. CLI apps provide a fast experience and increase productivity by eliminating the number of clicks. However, updating these apps can be challenging as these apps are most often self-contained binaries downloaded on users’ machines, and we have little control over that. Having developed many such CLI apps in Go before, we understand this problem, and in this blog post, we share an approach to solve it.
If you’ve built and distributed the app as a downloadable binary, asking the user to repeat the same process for a newer version is tedious and harms the user experience. We suggest you make your application “self-updatable”. This way, the application can check if any new releases are available and hint to the user that it can update the app whenever it wishes. Then the user can pass an additional CLI flag such as -u where the app will update itself correctly and let the user know. This provides a very smooth experience to the user as well.
Step 1: Get the latest release information
// Code snippet: Fetch the latest release information from GitHub
latest, _, err := githubClient.Repositories.GetLatestRelease(context.Background(), "<org>", "<repo>")
Step 2: Form an executable name
We will create an executable name based on the machine’s OS, ARCH and the latest tag name.
// Code snippet: Form an executable name based on assets in releases page
executableName := "cloudlens_" + strings.TrimPrefix(latest.GetTagName(), "v") + "_" + runtime.GOOS + "_" + runtime.GOARCH
Note: Formation of this executable name is completely depends on Github released assets.
Step 3: Lookup executable in the latest release information
Next, we need to find the executable in the latest release assets that matches the executable name we formed in Step 2. We will also get the corresponding asset ID and format (zip or tar).
// Code snippet: Lookup executable in the latest release information
var assetId AssetId
var format AssetFormat
loop:
for _, v := range latest.Assets {
    asset := *v.Name
    switch {
    case strings.Contains(asset, ".zip"):
        if strings.EqualFold(asset, executableName+".zip") {
            assetId = AssetId(*v.ID)
            format = Zip
            break loop
        }
    case strings.Contains(asset, ".tar.gz"):
        if strings.EqualFold(asset, executableName+".tar.gz") {
            assetId = AssetId(*v.ID)
            format = Tar
            break loop
        }
    }
}
Step 4: Download the latest version
Using the asset ID in Step 3, we will download the latest version of the executable from GitHub.
// Code snippet: Download the latest version
func downloadAssetFromID(assetId AssetId) (*bytes.Buffer, error) {
	_, rdurl, err := githubClient.Repositories.DownloadReleaseAsset(context.Background(), "one2nc", "cloudlens", int64(assetId), nil)

	resp, err := httpClient.Get(rdurl)

	defer resp.Body.Close()
	bin, err := io.ReadAll(resp.Body)

	return bytes.NewBuffer(bin), nil
}
Note: The artifact downloaded from Github is a zip file.
Step 5: Extract the executable based on the format.
Using the AssetFormat(Zip or Tar) in Step 3, we will extract the executable using archive/zip and archive/tar libraries.
// Code snippet: To extract executable
func getExecutableFromAsset(assetId AssetId, format AssetFormat) ([]byte, error) {
	buff, err := downloadAssetFromID(assetId)

	if format == Zip {
		zipReader, err := zip.NewReader(bytes.NewReader(buff.Bytes()), int64(buff.Len()))

		// Zip reader logic
	} else if format == Tar {
		gzipReader, err := gzip.NewReader(buff)

		tarReader := tar.NewReader(gzipReader)
	}
	return nil, fmt.Errorf("executable not found in archive")
}
Step 6: Apply the self-update
Now that we have the latest binary, we’ll use the github.com/minio/selfupdate library to apply the self-update.
// Code snippet: Apply the self-update
bin, err := getExecutableFromAsset(assetId, format)
if err != nil {
	// Handle error - can't get executable
}
updateOpts := selfupdate.Options{}
if err = selfupdate.Apply(bytes.NewBuffer(bin), updateOpts); err != nil {
    // Handle error - update failed, roll back if necessary
}
Reference to complete working example: https://github.com/one2nc/cloudlens/blob/main/cmd/update.go
In this post
In this post
Section
Share
Share
In this post
section
Share
Keywords
saas api endpoints, private api exposure, customer isolation api, api gateway, cloudflare tunnel, aws private link, secure api connectivity, cost effective api, b2b saas integration, vpc endpoints, multi tenant api, api authentication, api design saas, managed connectivity, cloud networking saas, one2n api management, api billing optimization, secure endpoint delivery, platform api isolation, enterprise saas api, direct connect saas, customer data privacy, zero trust networking, cloud api costs, private link integration


